Pages

Wednesday 25 February 2009

February Rudolph Day.....

It's that day again. Time for a spot of show and tell so I can get my points on SSCC.

Today, for your delight and delectation, we have CHRISTMAS TREES. Well, actually the brief was specifically just Trees, in whatever shape or form they take. So here are my first efforts. I may try and to a couple more tonight too.

First up is one that I did as part of Sketch Saturday a couple of weeks ago - but never got around to blogging. It also covers this month's challenge on Aunty’s Forum which was to use three of a variety of things. I seem to have lost my list of things you can use for that, but I do remember that it included Pasta shapes, ribbon, cotton/thread, beads, sequins, lolly sticks, tin foil. There were a couple of other things too, but I can't remember what they are for the mo. Most of mine have the old ribbon/bead/sequin or thread combo. I might try making something with pasta shapes before the weekend, but I digress....


Another one I really like is this. I've used two different cuttlebug folders on it - and had a little accident with the Swiss Dot one. It wasn't meant to deboss - I got the folder round the wrong way. Oops. However, I like the happy accident, and it's a bit different.


The others I'll just upload in a row now, or we'll be here all day!


9.30pm - one last addition!

Tuesday 17 February 2009

Paper Beads

I wanted to put more in my post yesterday, but the other half was mithering for me to join him in Telly Watching (a national sport in itself, in my house) so my various activities were somewhat curtailed.

In another swap on UK STampers some bright spark (Pinky!) came up with the idea of a paper bead swap. I used to do a LOT of quilling, so making paper beads is something I'm ok at. I even mastered the art of the round bead, once upon a time, which if fine if you want something that is only about 2mm in diameter! The reason being that the width to length ratio is so extreme that for anything larger you need an inordinately long piece of paper. LOL.

Anyway, I digress. Kind of.

I picked purple as my colour (what else?!) and these are my results. I only had to make 20, but one style of bead is so small that I decided to make double the quantity of those, so people don't feel short changed....


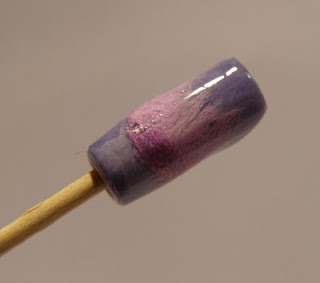
Now, I don't have a melt pot. Not yet, anyway - it's now on my ever lengthening list. But a melt pot may not have been able to achieve quite the results that I got with these beads. For starters, I use Versamark ink to give the UTEE something to adhere to, then heat it. And generally, I repeat ad infinitum until I have the thickness of coating I require. Of course, this has its own snag as you end up twirling the bead constantly to ensure that the huge great glob that wants to drip off and hit the deck, doesn't. Makes a nice embellishment when it does though! Well, on these beads I decided that after layer number 1 of the UTEE, I'd add a little moonglow embossing powder to create a bit of interest, heated as normal and then of course went back to the UTEE. I forgot that it would reheat the other EP, and in the process of constantly rotating the bead I wound up with the following effect. It really is scrummy in real life - like glass that's been stretched and wound during the blowing process.

It's at times like this I love my camera. It's an Olympus SP-510UZ, nothing too fancy, or even that expensive, but it has both Macro and Super Macro (sounds like a computer game!) functions on it. Which enables quality shots like these. I mean, you can even see the print dots on the paper I used for the beads!


Naturally, this post wouldn't be complete without a look at the teeniest beads I did. Bear in mind that I'm showing them off on cocktail sticks - so I put one of them on a pound coin, just to show the size properly! It's just plain purple paper, only 5mm wide, cut to a flag and wound slowly and tightly to create the rounder bead. UTEE just the same, but the last lot was a half dip in hologram powder. Gorgeous!
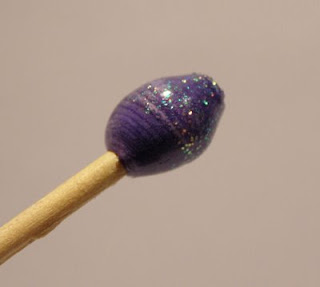
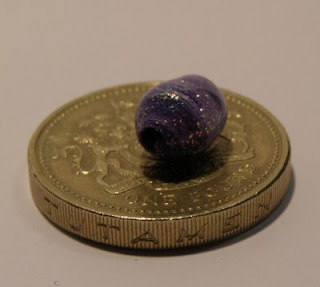


The bug has bitten - and once I have all my other swaps under control, I'm going to make more.

And more...

and more..............

Monday 16 February 2009

Altered Domino Swap & ATCs

Last month we did an altered domino swap on UK STampers . I've only just got into using Alcohol Inks (Tim Holtz IS a god...) so I thought I'd join in. What I have learned is that it's a good idea to remember that different coloured backgrounds affect the end result - I used the same inks on both the canvas and the dominos, but as one was white and the other cream, I got an odd effect. I also found out that alcohol inks strip the gold colour off German Scrap. It was just as effective a technique as adding the ink, to create a distressed look, but hey-ho.... I should point out that the frame is only about 4" x 2" approximately - weeny.


Images used were by Paperartsy and Judikins...


I've also realised that I completely failed to put up here the results of another ATC swap on Aunty’s Forum. The January swap was "Thank You for the Music" and my offering was very similar to the Metal one I did for UKSTampers:


And the ones I got back in exchange were....


Can you spot the deliberate mistake in one of the photos??? ROFL

Thursday 12 February 2009

Inchies

Well, I sent out even more inchies, and got some back this week.

Here are the inchies I did for the February swap on Aunty's Forum: I used medium weight card, and a mixture of stamps from various manufacturers. The theme was "New" - see if you can work what each of the "New" images mean (I defy anyone to get what the hourglass is representing!). They were stamped in Stazon, coloured in with pencils, edged with gold Krylon, and the word "new" printed, cut out and glued on. I then added a little Distress Ink in Scattered Straw around the edges.


The inchies I got back were from the UKSTampers "Let's Celebrate" swap for Jan 09. (See my examples below). Sadly a couple of people had to pull out, so we got some doubles - but to me that's just twice the love!


I hope to blog some more tomorrow - I got the "New" swap back, and sent out some "Oriental" ones....

Monday 9 February 2009

My 100th post! Woohoo!

It's taken me a while to get here though, hasn't it?

I've been rather busy of late, and I keep meaning to come back on here and post what I've been doing, even if I only post one thing a day. Amazing how real life gets in the way - I've just seen that my last post was on the 27th January, but it doesn't feel like it's been more than a week since I last blogged!

Anyway, onto the more interesting stuff.

From the Morti Creation Station this week we have.....

Well, the first one isn't my own work - remember the metal ATCs I posted about on the 25th, for an ATC Swap at UKSTampers? These are what I got in return!


Big thanks go to WyvernSian, Rukshana and Okey for their fabulous work!

Next up is a 3D decoupage card I did for my little friend Miranda who turned 7 on Saturday just gone. My apologies for the poor photo - the full sized image of the whole card turned out blurred when I downloaded it from the camera, but by then the card was on its way...

Anyway, it's quite a simple card, using the die cut Fairy Poppets 3D images, mounted onto one of the DCWV (I think) mat stacks (Once Upon A Time set), which was then mounted onto lavender pearlescent card. That in turn is on an A5 pale pink card, and there's organza ribbon and bling. LOL


Finally for this post (cos it's a work day, and I've got to run!) is a card I made for a birthday on the Birthday List at Aunty's.

Again it's 3D decoupage (relatively quick and easy and doesn't require a lot of extras to create the wow factor!).


Just realised something - my apologies for my exuberant use of parenthetical statements - just one of those days!!!
Related Posts with Thumbnails